
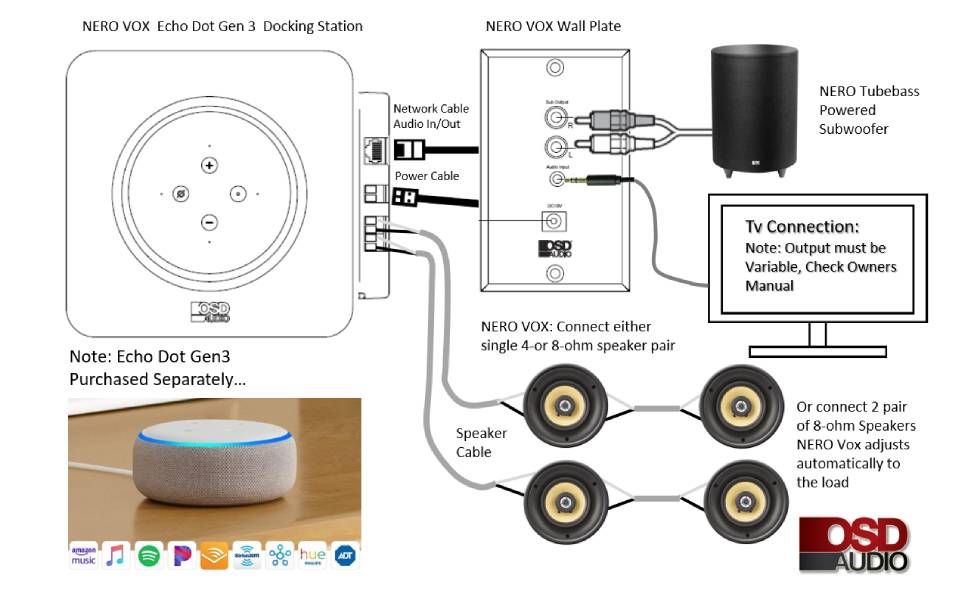
Nero Vox, Simple Whole Home Audio
Replace Old Volume Controls with Nero Vox
Do you have an old in-ceiling speaker system with volume controls or keypads on the wall? Do you want to update it to the latest, streaming, voice-controlled system? Here is how to do it inexpensively, with no additional wiring, and without having to hire someone to make it work.
Using the Amazon Echo Dot
You can replace the volume control with an in-wall Amazon Echo Dot mount. It includes a powerful amplifier that connects to your existing in-ceiling speakers – the OSD Nero Vox
Installation Steps
First unscrew the volume control; you do not need to worry about voltage because this is a low-voltage system that cannot harm you. You will see one of two things:
- There will either be speaker wires coming into the volume control (VC) and then other speaker wires going out. You can tell the difference by looking at the labels on the VC where it will show either input or output. The output speaker wires go to your in-ceiling speakers. The input speaker wires come from where your AV receiver or amplifier is located.
- Alternatively, you may see speaker wires going out to the in-ceiling speakers and another type of wire coming in.
Here is what to do in both cases.
For Speaker Wires Coming In and Out
Un-screw these speaker wires and label them according to the input and output labels on the VC. There should be Left (or L) + and – input and output, and Right (R) + and – input and output.
Now remove the VC from the wall.
The Nero Vox is going to be bigger than the VC you removed. We provide a template to allow you to mark the new cutout size. Use a drywall saw to enlarge the cut out to the template size. Connect the speaker wires that go out to the speaker, to the speaker output connectors (marked number 8 in the installation guide).
If you are not sure if the speakers are working or want to check which wire is connected to which speaker, here is a simple test:
Using a PP9 battery, touch the speaker wires to the battery terminals and you will hear a ‘pop’ coming from the speaker that the wire goes to. Once you know, label the wire.

Next, take the external power supply (number 16 in the guide) and go to where the input speaker wires start. Disconnect them from the AV, receiver, amp, or whatever they are connected to.
Choose one of the speaker wire pairs and label them + and -.
Next, connect these wires to the adapter supplied and plug the power supply into the adapter. Now go back to the Nero Vox and connect the speaker wire that has the power supply at the other end to the Power Connector (number 7) making sure to match the + and – ends. All the connections are now complete, and you can plug in the power supply.

Before installing the Nero Vox into the wall, it is worth testing the system. Do this by mounting your Amazon Echo Dot into the Nero Vox, turning it on, and going through the Echo Dot setup process. Once done you should be hearing the sound from your in-ceiling speakers.
If you have multiple rooms with VCs and speakers simply repeat the process. If you want to link different rooms, you can do this with the Echo’s mobile App.
For Different Types of Incoming Wires
If you have a different type of wire coming into the VC, here is what to do. If it is an RJ11, RJ45 Cat5/6 type wire, simply cut the connector off both ends. Pick any 2 twisted pairs, label 1 + and the other – at each end.
Next, take the external power supply (number 16 in the guide) and go to where the Cat5 wire starts. Connect these wires to the adapter supplied and plug the power supply into the adapter. Now go back to the Nero Vox and connect the twisted pair that has the power supply at the other end to the Power Connector (number 7) making sure to match the + and – ends.
All the connections are now complete, and you can plug in the power supply. Before installing the Nero Vox into the wall, it is worth testing the system using the same testing process mentioned previously (setting up your Echo).
For Two Incoming Wires
If the wire coming in is just two wires here is what you do. Each wire should be labeled + and -. Disconnect them from the VC and label them. Do the same at the other end.
Next, take the external power supply (number 16 in the guide) and go to where the wire starts. Then, connect these wires to the adapter supplied and plug the power supply into the adapter.
Now go back to the Nero Vox and connect the wire that has the power supply at the other end to the Power Connector (number 7) making sure to match the + and – ends. All the connections are now complete, and you can plug in the power supply.
Once again, before installing the Nero Vox into the wall, it is worth testing the system. Set up your Echo and listen for the sound.If you have any questions about our Nero-Vox whole house audio system, get in touch with us!